Monday, July 23, 2012

Polka Dot Painting

You probably already know by now that polka dots are all the rage. 

My friend, Julie, just moved and wanted to make some art for above her bed. She was inspired by this blog and images on Pinterest. We started talking about a Polka Dot Painting and she told me her ideas. She wanted to do it on a canvas and we both agreed that working with potatoes stamps isn't usually successful for us. So we brainstormed and went on a trip to MICHAEL'S!

Juile picking up supplies
 At Michael's we found these amazing round sponges with plastic holders by none other than Martha Stewart. Each is a different size in the package but it had the size we needed. They are officially called "pouncers." Julie picked out acrylic paints in shades of gray, blue, purple and white for mixing.

The Cast of Characters appearing in this craft are:
Pouncer + Goomba helped with spacing
Pencil
A Canvas
Acrylic Paint
Circular Foam Pouncers (sponges)
Scrap Paper
Two Rulers or Measuring Tape
Paint Palette and Palette Knife (or could use plate, bowl, chopsticks, paper clips, etc)
Lint Roller (in case your canvas needs a little dust removal)
Painters Tape (optional)
Paint Brush (for touch ups)


First: After you have gathered your supplies and lint rolled your canvas, it is time to MEASURE! This Polka Dot Painting will have evenly spaced dots. Julie chose to have a 3" border and her dots 3" apart. With measuring tape and a ruler we made tiny dots or x's every 3" to tell us where the dots will go.

Bunny Tip: We lined up the measuring tape with a ruler and held it down with painters tape. This way we could quickly get an entire row done.  If you mess up, no worries. The pencil erases right off the canvas. AND the pencil doesn't show underneath the paint as well. 


Second: Mix your paint colors! We got a white paint to mix with the others to create different shades. Julie made each color as she went along. We tested the colors on scrap paper.

Third:  Stamp dots on the canvas! Stamp one color at a time and in random spots on the canvas. Make sure you eyeball where you are putting the dots so they are evenly spaced throughout.


Bunny Tips for using the Pouncer: 
Sometimes the paint didn't evenly spread across the sponge. Julie used her fingers or scrap paper to make sure it was evenly spread on the sponge and wasn't collecting around the sides. It isn't necessary to press the sponge all the way down, but you can. Paint will collect in the sponge so you don't have to reapply for each dot.

Some Pictures of the Process
With a few colors
Fourth: Finally, let it dry! 

The finished polka dot painting


Julie with her finished Masterpiece
Bunny Tip: When the canvas is dry, you can go over any little mistakes with white paint.


Lastly, I got a little inspired watching Julie dot away. I had a canvas laying around the house, so I tried making my own without even spacing. I randomly spaced some of the dots and clustered others close together.


A big "Thank You" to Mr. Hulse who took photos, brought us water AND washed our dinner dishes! 
I have the best husband ever.

Friday, July 20, 2012

New Photo Roundup! Weekly Roundup!

I've had some requests to share my Instagram pictures on the blog from non-Instagramers. Like the ones I shared from Maine. So, here we are...

Some things I did 
                                    or My Week in Pictures.

Upcoming post!
Julie and her new masterpiece!

Brooklyn Botanical Gardens (isn't that stone owl genius!)
I had a real attraction to ceramic cats this week....
Central Park Art (Enjoying it much more than the tires..)
Central Park Picnic with Mr. Hulse and a duck...
Mets Vs. Cubs 
Dinner View in Sea Cliff with Family In-Law

First #Mood photo


Friday, July 6, 2012

Goodbye Maine!

Leaving Maine. Have you ever been? Had such a fun vacation. Wanted to share some of my Instagram pictures with you.

Monday, May 21, 2012

Star Wars Scrabble Coasters

I made my hubby Star Wars Coasters for his birthday!! They came out really nice and he loved them. I had to make them very quickly while he was out of the house!

Here is a quick re-cap of how I made them and my mistakes.

Some Bunny Tips are included if you are going to make them yourself!


Materials

Scissors
Hot Glue Gun
Scrabble Tiles (Mine were a heavy plastic)
Ruler or Measuring tape
Thin Cork Board (got mine at Michael's) 


Step 1
First I measured a coaster I had in my home and planned on making coasters
with four letter words. Then I wrote out my combinations for each coaster.


 Step 2

Arrange your letters. I measured and pre-cut the cork board into coasters. 


 Step 3

I hot glued the tiles directly onto the cork board and to each other as I placed them.


Step 4

After the glue dried, I trimmed any extra cork board. 


Bunny Tips-

1) Some of the Coaster have warped a little bit. Next time I would but a heavy book on top of the coasters as they dry.

2) I ripped a couple coasters when gluing the letters on... It may be easier to glue all the letters to each other AND then back it with the cork board.


Wednesday, May 9, 2012

Welcome Bags

Happy Wedding Wednesday! 

I'm headed off to Austin, TX today but wanted to share some photos and wedding tips! 

I wanted to have some kind of "Welcome Bag" for out of town guests in the hotel blocks we reserved. For those of you out of the loop, the Welcome bag is for out of town guests and should have some things they need inside. Ours were filled with wedding info, water (with a wedding label!), gum, snacks, maps and brochures. 


For the bag themselves, you can use any bag. We wanted it to be an eco-choice but fabric tote bags weren't in our budget. So we collected every brown bag that was gently used. I was even trading with friends when I saw them carrying a bag. 


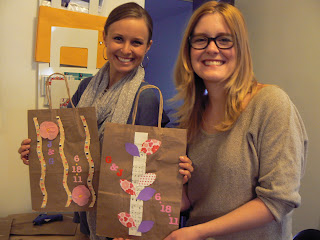
  I decorated this bag myself and hosted a craft night with my friends. I told them to use mine as inspiration and go wild! I got out all of my paper scraps, stickers, die cuts, stamps, etc and let them create! Their designs were amazing and I couldn't have pulled this off without them. Thank you!!!


 Here are some of the things they came up with:


The Lovely Bertha Leal

Anna Koonin and Emily Furr

Emily Furr