Wednesday, November 2, 2011

Where you been?

We haven't written in so long... and amazingly...you are still reading Cozy Rustic! We've had more than ten readers this week...and we haven't posted since April. And people are sharing Cozy Rustic! I've found our projects all over the web! On Pinterest and other crafty sites!! Shocker!

Where have we been you ask?

Well... I got married. That took up some of my time...or ALL of it.

Bea has been busy writing and work-shopping breakthrough musicals. She has also started another blog called Giant Dorkgasm. Check it out!

Photo by Gabe Rizzo with Tuesday Night Pictures

I've come back to Cozy Rustic to keep up the crafty posts and share my wedding projects with you. Above is a photo of me walking down the aisle in honor of Wedding Wednesday... and for all of you that just look at the pictures..

Thanks for staying with us!

Love Bunny

Tuesday, April 5, 2011

Show Off!

I made a Brooch Bouquet and I just wanted to show it off!


Here's a QUICK recap of how I made it:

1) I hunted for Brooches! I had a collection from my childhood, my mom contributed and my fiance's grandmother. I scoured Ebay, Etsy and all the local thrift stores for the rest... Just like the Hankies it took months to find them all!

2) I got my supplies together:

40 Brooches (approx)
Hot Glue!
Styrofoam wand holder
2 types of wire ( a thick/flexible craft wire and a thin/green 18gauge wire)
Wire Cutters

I labored over which wire to choose and my local Michael's had very little selection. So I got a gold craft wire in the Jewelry Section and a thin wrapped green wire near the hot glue. They both worked lovely! You just need a stiff wire for the stem for the brooches and a flexible wire to steady them.

3) I researched how to make it! I used Ms. Awesome and Seamstress of Avalon to put the bouquet together.

4) I created a 4 or 5 inch stem for each brooch, stabilized it with craft wire and hot glue. Then I hot glued each brooch into the Styrofoam wand holder.

5) When I was researching, I saw lots of posts about how hard and expensive these are to make. I made the bouquet for about half of what people estimated and it was EASY to make! It really was simple and it just came together. I did it over the course of three nights and two movies (My Fair Lady & Wuthering Heights). About 4 hours of putting it together.


6) I will add ribbon to the handle as the Wedding date gets closer!


Sunday, March 13, 2011

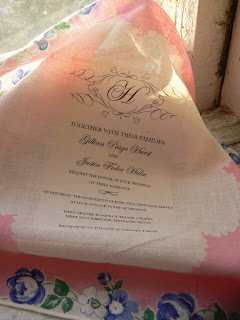
Wedding Invitations on Vintage Hankies


It has been so long since I've blogged. Apologies all around my crafty friends.

You can see what I've been up to here: Wedding Invitations on Vintage Hankies. This was in some ways less, and some ways more, of an undertaking than I thought it would be. Thank you to all my friends and family who helped!


I got the idea from seeing Hankie invitations in Real Simple and from Bird and Banner. I had a couple of vintage hankies myself and thought, "HOW CUTE!" I became obsessed with the idea and HAD to do it... even though it seemed too expensive, too complicated, etc. After careful consideration, Justin and I decided this would be something special to send people. I was worried they wouldn't be as stunning as Bird and Banner's, but I hoped for DIY adorable!


I used the tutorial from The Wedding Chicks as a starting point. I think their method really is the way to go. Definitely think about your budget and how you will mail these BEFORE you start. Hopefully, these steps and tips will help you. I think I figured out a great way of using iron on transfers for dark fabric! You DON'T need hankies that are BLANK in the center!!!! You don't need them!!! You can use just about any hankie!!! Even ones that are thin, dark and covered with flowers!!!

What you need to make these lovelies:
Vintage Hankies
Lint Roller
Iron on Transfers
Iron
Pillow case


Step One: Find your Hankies


Wedding blogs say this is the hardest part. It does take quite a bit of thrift store searching, so give yourself a couple of months. I found mine at two thrift stores, The Brooklyn Flea, The Chelsea Garage and Etsy. I collected enough for 150 guests. Make sure you have enough, because everyone will want one!

Bunny TIP

Be flexible. I bought a variety of hankies and not all of them were in mint condition. We bought some with beautiful patterns, even if they had small holes or tears. These were usually marked down as well.

Buy Vintage. There are some sellers out there selling "vintage like" hankies. Help out the planet people and buy second hand!


Step Two: Create a Template

The Wedding Chicks have an Invitation Suite that is free to use! I really loved it. The look was beautiful. I do recommend having a couple sets of eyes look over your template in case of spelling errors...which I made on my blue template...


Step Three: Print your Template onto Iron on Transfers

Follow instructions that come with your transfers. You may have to invert the image!

Bunny Tip


Make sure you research Iron On Transfers before buying. Find which ones will work best for your hankies, based on pattern and thickness. I tried a generic brand from Michael's and two Avery brand transfers. The generic brand from Michael's for Light Fabric (8x11) was great, though it did bleed on some of my thinner hankies. The transfers for light fabric must be used on a thicker hankie that has a blank center. My favorite was Avery brand for dark fabric (4x6). It has a white background so you can use it on any Hankie and it won't bleed. You also do not have to invert the image and it is a great size for mailing.


Step Four: Prepare your Hankies, Iron on area and Iron on Transfers


My dear fiance made a Iron-On area with a pillow case clamped to a table. It worked out perfectly! Iron the pillowcase to make sure it is wrinkle free. I washed, steamed and ironed all my hankies to get them ready. Then I lint rolled them. Lint will show up encased in the Iron on Transfers... I trimmed my iron on transfers with a paper cutter, sometimes scissors or just a corner rounder.
Here you can see my talented friend Amanda from The Disney Chick making some invites! She was really good at it!!

Step Five: Iron on


Follow your packet's instructions on how to iron on. Many include peeling paper and ironing through tissue paper (provided).


Step Six: Prepare them for the mail!


My mailing envelopes and tips will be in Invites Part II this week!


All photos belong to Briar Winters from Marble and Milkweed. If you would like to re-blog or use any of the pictures, email us at cozyrustic@gmail.com for permission.

Monday, February 14, 2011

Paper Heart Ornament


Happy Valentine's Day!


Today, I'm sharing with you this fun craft and our first ever video blog! Below are the instructions to get you ready to craft along with the video. Even if you aren't crafting, you can watch the video and see how I closed me sweater with a clothes pin...


What you will need to make the paper hearts above:

1) Stapler (OR glue and binder clip)
2) Scissors and paper cutter
3) Hole punch
4) Paper * - 12" strips x 2, 10" x 3, 7" x 3
5) string or yarn for hanging

* You can use any kind of paper: maps, comic books, sheet music, construction paper, etc.


Before watching the video you will need to cut out your paper strips. You can see above I used sheet music. Curbly.com has some great directions for making similar ornaments and different sizes. If you get confused, check out their website.

1) Cut two strips that are 12 inches long and 1.5 inches wide.

2) Cut two strips that are 10 inches long and 1.5 inches wide.

3) Cut three strips that are 7 inches long and 1.5 inches wide.


Below are a couple variations

Variation 1-
Omit the extra 7" strip.


Variation 2-
Omit the 7" Strip and do not tuck the strips into the bottom. Instead collect them all at the top and staple. This works well with heavier paper

Thursday, February 3, 2011

Sneak Peak: Invitations!


Wanted to share this sneak peak or "Before photo" of my wedding invitations! I became obsessed with the idea after seeing a Save the Date in Real Simple's Wedding Magazine. It is rather trendy right now and I'm seeing quite a few hankie invites all over the wedding blogs.... but I still HAD to do it! It is not an easy task to seek out these hankies and collect them. And not knowing how to silk screen... it will be iron on transfer all the way! I did try to print on them from my printer.. but it didn't work out very well!

Enjoy the Hankies!


Tuesday, February 1, 2011

Crafting without Lights

The Bunny household is a flutter with wedding planning... lots of booking (hotels, photographers), dessert browsing and INVITATIONS! There will be another craft night this weekend with some lovely helpers and I promise to post a sneak peak.

I spent a good hour mulling over things at Paper Presentations last night (my third visit this week) and was very eager to get things ready for craft night. So, this morning I planned on getting some envelope liners into envelopes. I cut around a paper doilies til the lights went out.


They went out because of this fire hole outside my apartment. I did try to sit back down and glue liners in the dark but had a hard time seeing things well enough on this gray day. I did ponder candles and flashlights to set up a work area...colonial people crafted without electricity! Before the candles could come out, the fire department needed to get in the building to bust open our basement door. Then, I went to work.

Thus, with no electricity I'm heading to my mother-in-law's place... without my Spanish Homework for my class tomorrow..tmi?

Monday, January 31, 2011

Ah! Sunday!

It's Sunday, so of course I had to do a little DIY. Though, I hadn't planned on it.

In mid-December I adopted the most wonderful, beautiful 4-legged buddy a gal could ask for. She loves me. She loves me oodles and gallons and tons. However, that means she misses me like crazy when I leave. Literally crazy.

Parsley has severe separation anxiety, so every day when I Parsley-proof the house and head to work, I have no idea what it'll look like when I get home. It's been getting better and better. She no longer seems to eat books. But somethings are just too tempting. Like the boxes of cereal on the waist high shelf in the kitchen.

So today I decided I was done tempting fate and hoping that Parsley wouldn't get into things. I bout some L brackets and a laminate white shelf, and I got out my favorite toy the drill. Voila!


Please note the half destroyed cereal box.

Anyway, with a little help from my friends from my feller, I got the shelf put together and up on the wall in very little time. Use braces for your screws, my friends. Don't get any crazy ideas! The whole purpose of a shelf is ruined if it falls.

Some indoor gardening happened this weekend as well, but that post will have to wait. I'm off to gaze at my shelf!

Friday, January 21, 2011

Spread the Love!

Hey Cozy Rusticers!

Bunny just alerted me about this amazing opportunity to not only make something with care and love, but to also bring smiles to the elderly!

"How??" you ask? Well!

By participating in Special Delivery: Share Your Love 2011!

Check out the link for sure.The good folks at Etsy will be "working with Citymeals-on-Wheels to bring nutritious meals, handmade greeting cards and companionship to elderly New Yorkers."

Bunny and I will definitely be crafting some hand-made Valentine's Day cards to go out to the senior citizens in our area, and we hope you'll get inspired and craft some as well.
Image from Martha Stewart

Etsy does have a few rules about what should be on the cards, and when they are due, so, again, please click that first link if you're interested in participating!

Get crafting!
Bea

Thursday, January 20, 2011

Seeing the world through a fresh lens


This year I decided I would take a photo every day for a year. It's not an original idea by any stretch of the imagine. A Google search reveals that some 61 million people have had this idea!
But even if it's becoming a cliché to do a 365, it's still teaching me new things. I dove into the project with my old digital point and shoot camera, which I have always enjoyed playing with. And I started looking at more and more photography very quickly, and I feel like so far in 2011 I have done a pretty impressive job (to me anyway) of figuring out my personal aesthetic. When I look at an image, I like to see life, clean lines, edges that pop, and calm. Like this photo I took on my new Sony Alpha A390 DSLR:


Where am I going with this? Well, life, clean lines, edges that pop, and calm are what I like to have in my home. What pleases my eye in a photograph pleases my whole being in my surroundings. I feel like I've been studying to learn how to be inspired, and circularly, I'm inspired to study.

Starting what was meant to be a simple, fun project has set me on a path I hadn't expected. I used a chunk of my holiday bonus from my funstopper job to purchase a beginner digital SLR camera, and I've been studying up on how to create the aforementioned clean lines, edges that pop, calming, life-filled images that please me so much.

A hobby has been born, and I think that this hobby will have a large influence on my day-to-day life in my home. I see each part my dwelling in a new light and in greater detail, and ever photo I take of my home lets me see something I hadn't seen before. I keep getting ideas on how to decorate and rearrange and tidy up that I hadn't had before.

So here's my thought for the Cozy Rustic readers: even if you don't have a "you-paid-HOW-MUCH-for-that-camera?!" camera, go around your home and take photos. Lie on the floor and take photos. Stand on your couch and take photos. Sit at your desk and take photos. Crawl under your dining table and take photos. Zoom all the way out. Zoom in as close as you can. Use the flash. Turn the flash off. Photograph the inside of your fridge. When you sit down to look at your handy work, you might just feel like you're seeing your home sweet home for the very first time! And who knows what you'll learn from the experience!

BONUS: Here are a few shots I took just in my living room tonight. Nothing was placed and set. This is just how the room was.

Sunday, January 16, 2011

Update on t-shirt necklaces and our CONTEST WINNER!

Hi readers.

First off, please let me apologize for the extended break from posting. I've been finishing up the first draft of a musical (I write musicals) for a reading on Wednesday, and working on it has sort of eaten my life up over the past week.

Tonight, however, I did find time to finally make a t-shirt necklace like the one Bunny made here.
Mine is from an all white t-shirt, and I took Bunny's advice and stretched all my loops at the same time. I know that won't make sense unless you read Bunny's post, so please click the above link. Anyway, Bunny had suggested making matching bracelets with the sleeves, so I attempted it.

Sadly, it didn't work out for me. My t-shirt had short sleeves and they were angled in a way that only gave one loop per sleeve. The loops were too baggy to wear, but too small to double up, so they just wound up falling off. I'm fine with them falling off though, because unlike the necklace, the bracelet looked like I simply had rags wrapped about my wrist.

I think this could work if your shirt had baggier, larger sleeves than mine did, but I thought about it, and I think almost all of my t-shirts have similar sleeves. I suppose there's no harm in trying it out, though. Go for it!

And now what you've all been waiting for!!!

The winner of our big contest for a t-shirt necklace is *drumroll* Pamela Veazie! We selected her using Random.org to generate a random number between 1 and 15 (our number of subscribers who aren't just ourselves) and then found the corresponding follower.
Congratulations, Pamela! Your t-shirt necklace will arrive soon!

Be sure to keep checking in for future giveaways.

Cheers,
Bea