Monday, January 31, 2011

Ah! Sunday!

It's Sunday, so of course I had to do a little DIY. Though, I hadn't planned on it.

In mid-December I adopted the most wonderful, beautiful 4-legged buddy a gal could ask for. She loves me. She loves me oodles and gallons and tons. However, that means she misses me like crazy when I leave. Literally crazy.

Parsley has severe separation anxiety, so every day when I Parsley-proof the house and head to work, I have no idea what it'll look like when I get home. It's been getting better and better. She no longer seems to eat books. But somethings are just too tempting. Like the boxes of cereal on the waist high shelf in the kitchen.

So today I decided I was done tempting fate and hoping that Parsley wouldn't get into things. I bout some L brackets and a laminate white shelf, and I got out my favorite toy the drill. Voila!


Please note the half destroyed cereal box.

Anyway, with a little help from my friends from my feller, I got the shelf put together and up on the wall in very little time. Use braces for your screws, my friends. Don't get any crazy ideas! The whole purpose of a shelf is ruined if it falls.

Some indoor gardening happened this weekend as well, but that post will have to wait. I'm off to gaze at my shelf!

Friday, January 21, 2011

Spread the Love!

Hey Cozy Rusticers!

Bunny just alerted me about this amazing opportunity to not only make something with care and love, but to also bring smiles to the elderly!

"How??" you ask? Well!

By participating in Special Delivery: Share Your Love 2011!

Check out the link for sure.The good folks at Etsy will be "working with Citymeals-on-Wheels to bring nutritious meals, handmade greeting cards and companionship to elderly New Yorkers."

Bunny and I will definitely be crafting some hand-made Valentine's Day cards to go out to the senior citizens in our area, and we hope you'll get inspired and craft some as well.
Image from Martha Stewart

Etsy does have a few rules about what should be on the cards, and when they are due, so, again, please click that first link if you're interested in participating!

Get crafting!
Bea

Thursday, January 20, 2011

Seeing the world through a fresh lens


This year I decided I would take a photo every day for a year. It's not an original idea by any stretch of the imagine. A Google search reveals that some 61 million people have had this idea!
But even if it's becoming a cliché to do a 365, it's still teaching me new things. I dove into the project with my old digital point and shoot camera, which I have always enjoyed playing with. And I started looking at more and more photography very quickly, and I feel like so far in 2011 I have done a pretty impressive job (to me anyway) of figuring out my personal aesthetic. When I look at an image, I like to see life, clean lines, edges that pop, and calm. Like this photo I took on my new Sony Alpha A390 DSLR:


Where am I going with this? Well, life, clean lines, edges that pop, and calm are what I like to have in my home. What pleases my eye in a photograph pleases my whole being in my surroundings. I feel like I've been studying to learn how to be inspired, and circularly, I'm inspired to study.

Starting what was meant to be a simple, fun project has set me on a path I hadn't expected. I used a chunk of my holiday bonus from my funstopper job to purchase a beginner digital SLR camera, and I've been studying up on how to create the aforementioned clean lines, edges that pop, calming, life-filled images that please me so much.

A hobby has been born, and I think that this hobby will have a large influence on my day-to-day life in my home. I see each part my dwelling in a new light and in greater detail, and ever photo I take of my home lets me see something I hadn't seen before. I keep getting ideas on how to decorate and rearrange and tidy up that I hadn't had before.

So here's my thought for the Cozy Rustic readers: even if you don't have a "you-paid-HOW-MUCH-for-that-camera?!" camera, go around your home and take photos. Lie on the floor and take photos. Stand on your couch and take photos. Sit at your desk and take photos. Crawl under your dining table and take photos. Zoom all the way out. Zoom in as close as you can. Use the flash. Turn the flash off. Photograph the inside of your fridge. When you sit down to look at your handy work, you might just feel like you're seeing your home sweet home for the very first time! And who knows what you'll learn from the experience!

BONUS: Here are a few shots I took just in my living room tonight. Nothing was placed and set. This is just how the room was.

Sunday, January 16, 2011

Update on t-shirt necklaces and our CONTEST WINNER!

Hi readers.

First off, please let me apologize for the extended break from posting. I've been finishing up the first draft of a musical (I write musicals) for a reading on Wednesday, and working on it has sort of eaten my life up over the past week.

Tonight, however, I did find time to finally make a t-shirt necklace like the one Bunny made here.
Mine is from an all white t-shirt, and I took Bunny's advice and stretched all my loops at the same time. I know that won't make sense unless you read Bunny's post, so please click the above link. Anyway, Bunny had suggested making matching bracelets with the sleeves, so I attempted it.

Sadly, it didn't work out for me. My t-shirt had short sleeves and they were angled in a way that only gave one loop per sleeve. The loops were too baggy to wear, but too small to double up, so they just wound up falling off. I'm fine with them falling off though, because unlike the necklace, the bracelet looked like I simply had rags wrapped about my wrist.

I think this could work if your shirt had baggier, larger sleeves than mine did, but I thought about it, and I think almost all of my t-shirts have similar sleeves. I suppose there's no harm in trying it out, though. Go for it!

And now what you've all been waiting for!!!

The winner of our big contest for a t-shirt necklace is *drumroll* Pamela Veazie! We selected her using Random.org to generate a random number between 1 and 15 (our number of subscribers who aren't just ourselves) and then found the corresponding follower.
Congratulations, Pamela! Your t-shirt necklace will arrive soon!

Be sure to keep checking in for future giveaways.

Cheers,
Bea

Sunday, January 9, 2011

Apple Blueberry Crumble

Tonight I decided to bake, but I also wanted to attempt something new, so I made my first crumble.

It was so easy and delicious, I knew I had to share it. Whenever I bake apple pies, I just sort of guess with everything, and I did that again tonight, but I'll try to share my creation in terms more accessible for the normal baker.

You'll need:
  • 2 large apples good for baking. I used Granny Smith apples.
  • 2 cups of blueberries
  • 1 frozen pie crust
  • 1 T cinnamon
  • 1 T nutmeg
  • 1/2 cup sugar
  • 1 cup butter (quartered)
  • 1/2 cup brown sugar
  • 1 cup flour

Preheat that oven to 350 degrees. Get 'er good and hot!
Peel the apples and cut them into thin slices. The thinner the better.

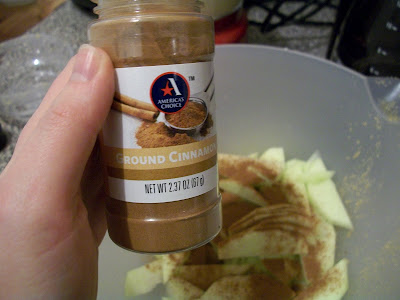
Put the apple slices in a large bowl and cover them with the nutmeg, cinnamon, and sugar. Stir them so they are evenly covered.

Add your blueberries (rinsed and drained) to the bowl and stir them in as well. Thinly slice one quarter of the cup of butter and place the slices along the bottom of your pie crust. Pour apple and blueberry mixture into pie crust on top of butter slices.

For the crumble, simply mix the brown sugar, flour and remaining butter together with your hands (yep, it's messy, but fun) until it...well... get crumbly. If it's not getting crumbly, keep adding flour. Then sprinkle it over your fruit in your pie crust until it completely covered.

Bake at 350 degrees for 40 minutes. Allow to cool for 15 minutes or so before eating. I served it with Bird's Custard (weird, British, delicious thing you make in a saucepan out of a powder and some milk), but it would be equally delicious with vanilla ice cream.
Enjoy!
Bea

Wednesday, January 5, 2011

How's that list coming along?

You may remember my GIANT TO DO LIST from mid-December.

Let me give an update.
Got the futon for the guest room/office off of good ol' Craigslist, and it cost only HALF of my futon budget.
We toss some pillows and a throw on it as well to introduce a new color to the apartment. Maybe it's a little too bold a new color, but we'll meld it in.

I put some more art up too, by framing some postcards and albums, as you can see here.

The rug in the guest room/office and the nightstand for the feller both have happen, somewhat by accident, too. The rug was simply moved from one room to the other, and it works. The nightstand was found on the street.

Yay! Progress! I'll keep you posted on the whole process of gussying up my apt!

cheers,
Bea

Tuesday, January 4, 2011

Bea's Christmas Gift

I had a little help making Bea's Christmas gift back in November. And I have to say that crafting with loved ones and friends is much more fun than crafting alone!


I knew that she was going to send out Holiday Cards to a long list of friends and family...so I made her return address labels. I didn't post because they have Bea's address on them, but I will tell you how I made them. I used Avery Return Address Labels to post Bea's address on each label. I centered her address all the way to the left, leaving room for decoration. We stamped her initials on some, Santa on others and we also used Christmas stickers! They turned out really cute (you'll have to trust me).

As a bonus, I used larger Avery labels to make Book Plates! Printed them up with this:

And them stamped them to look like this:

Monday, January 3, 2011

New Year's Eve Party

I rang in the 2011 by hostessing a soiree at my apartment this year. I want to hostess more often to 1. be more social and giving and 2. have incentives to keep fixing up my home. Anyway, it worked out nicely, because I got inspired to hang/invent some new art and I had a great time with my guests!

I forgot to upload the framed albums I put up as art (Michael's sometimes has amazing frame sales. I got my LP frames for $4 a pop), but I did upload this turtle postcard that I framed. It adds an air of whimsy to the hallway, and it cost nothing to do.
I also framed a card that our neighbors gave us at our housewarming party last June. How cute is that little house??
Anyway, I went into party planning knowing that a 7-layer dip had to happen. I mean, duh! I always do a veggie side and omnivore side in the same large glass lasagna dish, splitting the two sides with a thick layer of aluminum foil. Here are my layers
1. Refried beans
2. Shredded cheddar
3. Tomato and garlic salsa
4. Black beans
5. Guacamole
6. Sour Cream (totally forgot this on NYE0
7. Beef (or corn on the veg side)
Then I do more cheese on top, but cheese is already one of the layers, so I'm not going to use the same ingredient twice and call it 8-layer dip. That's lazy.
Of course, to counter balance that savory goodness, I had to make my grandmother's sugar cookies. No recipe, as it's a secret, but I will let you know that butter and sugar start the whole thing, and there is little in the world I love more than butter and sugar in combination.
Artichoke and romano bruschetta also happened.
As did cocktail weenies in BBQ sauce. No photos of weenies are allowed on this blog.

I snagged this little wooden crate from the recycling room in my office. I want to paint it and toss legs and casters on it so it can serve as a drinks cart, but for the party it was just a drinks crate.
My BFF brought amazing Pick Your Nose Paper Cups for everyone to drink out of. I'm modeling the large shnoz with blonde mustache below.

And of course, Miss Parsley was the belle of the ball!

Happy 2011, everyone!
Banner template from The Sweetest Occasion.

Cheers!
Bea

Sunday, January 2, 2011

Quick and Easy

A couple of days ago I did the quickest craft of my life. I was cleaning off my desk and came around a scrap of pretty, sturdy paper leftover from when I recovered that notebook for Bunny.

I didn't want to toss the paper out, because it was so pretty, but I wasn't going to keep it unless it could be repurposed into something useful. So I punched a hole in the top and looped a scrap strand of embroidery floss through the hole.

Voila! Perfect, easy, elegant bookmark!

Hooray for super simple crafts!

Happy New Year!
-Bea

Saturday, January 1, 2011

New Year's Giveaway!

In honor of the New Year, Bea and I are giving away a t-shirt necklace and bracelet handmade by us!

To enter the contest all you have to do is become a follower of Cozy Rustic. Click "Follow" in the upper left margin of the blog. Then sign in with google, gmail, twitter or yahoo. There are a few other options as well.

You have until January 15th, 2011 at 8pm Eastern time to follow.

Bea will announce the winners after the deadline.

Happy New Year Crafters!

UPDATE!! 1/16/11: This contest has now closed. Congrats, Pamela, on winning a hand-made t-shirt necklace!

That's my jam!


Hi all!

I've finally given out all the jam that I made to give away as Christmas presents. Let me tell you a bit about it now.

I got two large cartons of strawberries, two cartons of blackberries, and two cartons of raspberries (about 8 cups of fruit total) and some lemons (for juice) at the grocery store. I also got a dozen 4 Oz Jelly Jars and a package of pectin.

The pectin package had jelly making instructions, but I used an online tutorial (with some personal modifications) to make my jam.

Here goes.

1. Boil your jars for 10 minutes to sterilize them. I did not have a pot big enough for this, so I sealed up my sink, put the jars in, and poured boiling water from a few pots onto them. Then I set the timer. There are pots made specifically for boiling jars, but I don't make jam often enough to merit spending $30 on something like that, so I improvised.

2. While your jars are sterilizing, rinse your fruit, cap your strawberries, and toss them in a food processor or blender. Don't blend the fruit into oblivion. Just get it mashed up.

3. Now pour your mashed up berries into a large pot. I used a ceramic Dutch oven on top of my stove. You want something that heats evenly. I like my Dutch oven, because I know it's less likely to scorch my food.

4. Squirt in some fresh lemon juice to act as a natural preservative. I used about a quarter cup. NOTE: Don't lick the lemon juice off your fingers. I don't know if other people suffer from the horrible urge to lick lemon juice off their fingers, but any time I cook with it, I always wanna put my fingers in my mouth. It's a weird thing from childhood that would have Dr. Freud going bonkers, I'm sure, but just don't do it! The whole reason you boiled everything is because you need everything super sterile for the jam to keep without chemically preservatives.

5. Set your jars out to dry before you turn on the heat on your fruit.

6. Toss your lids (oh, yeah! Those!) in a pan of boiling water. You only need an inch or two of water. Boiling them softens the seals and sterilizes them, too.

7. Bring those berries (or whatever other fruit your using) to a gentle boil and add your pectin. The amount you use depends on how much fruit your using and the brand of pectin you get. That's where the instructions from the package come in handy. My pectin package had me make "calcium water" by mixing a powder pack with some water and then adding the pectin to that. It wasn't hard to do, but not all pectins are like that, so read them instructions.

8. Okay. Boil that stuff and add sugar. You use a lot of sugar to make jam. Like. A lot. My eyes popped about a foot out of my head when I read how much the online tutorial I found wanted me to use. I cut it in half, and I think my jam wound up being very fruity tasting, but not sugary, which is what I wanted. I used 2 cups of sugar with my jam. But I guess you can use up to 4 cups, based on the tutorial I found (PS I would link it, but I can't find it now! It's been a couple months since I made the jam.)

9. Bring this to a rolling boil and stir it CONSTANTLY!!! A rolling boil, I learned recently, is a boil so strong that it doesn't seem to notice that you are stirring like a maniac.

10. After you've boiled for 7 minutes or so, pour your jam into your jars. This was the part I had the hardest time with. I suggest getting a jar funnel. They're about $2 and you can find them at most larger stores (Target, Wal-Mart, etc). I didn't have one, so I was spooning everything into my jars. It took a while. Anyway, fill your jars up and leave about a quarter inch of space at the top. Then slap on those nice sealing lids you boiled (everything is hot when you make jam. Prepare to lose a layer of skin off your palms.), and screw them on tightly.

11. Boil your closed jars for 10 minutes. Yup. I used the sink method again.

12. Set your sealed jars in a dark, cool spot and leave them alone. You'll get to hear bizarre popping sounds as they cool. That's the jar being sucked down and sealing more completely. If you can pop the button on the lid after a couple of hours, it didn't seal. No biggie. Just boil it and cool it again. All my jars sealed within thirty minutes.

There you have it. Very Berry Jam by Bea. Label it however you want and feel like the domestic god/goddess you are!